Face tracking
Use the MediaPipe Face Detector and Landmarker solutions to detect and track a human face in image, video, and camera stream.
Used Rerun types used-rerun-types
Image, Points2D, Points3D, Boxes2D, AnnotationContext, Scalars
Background background
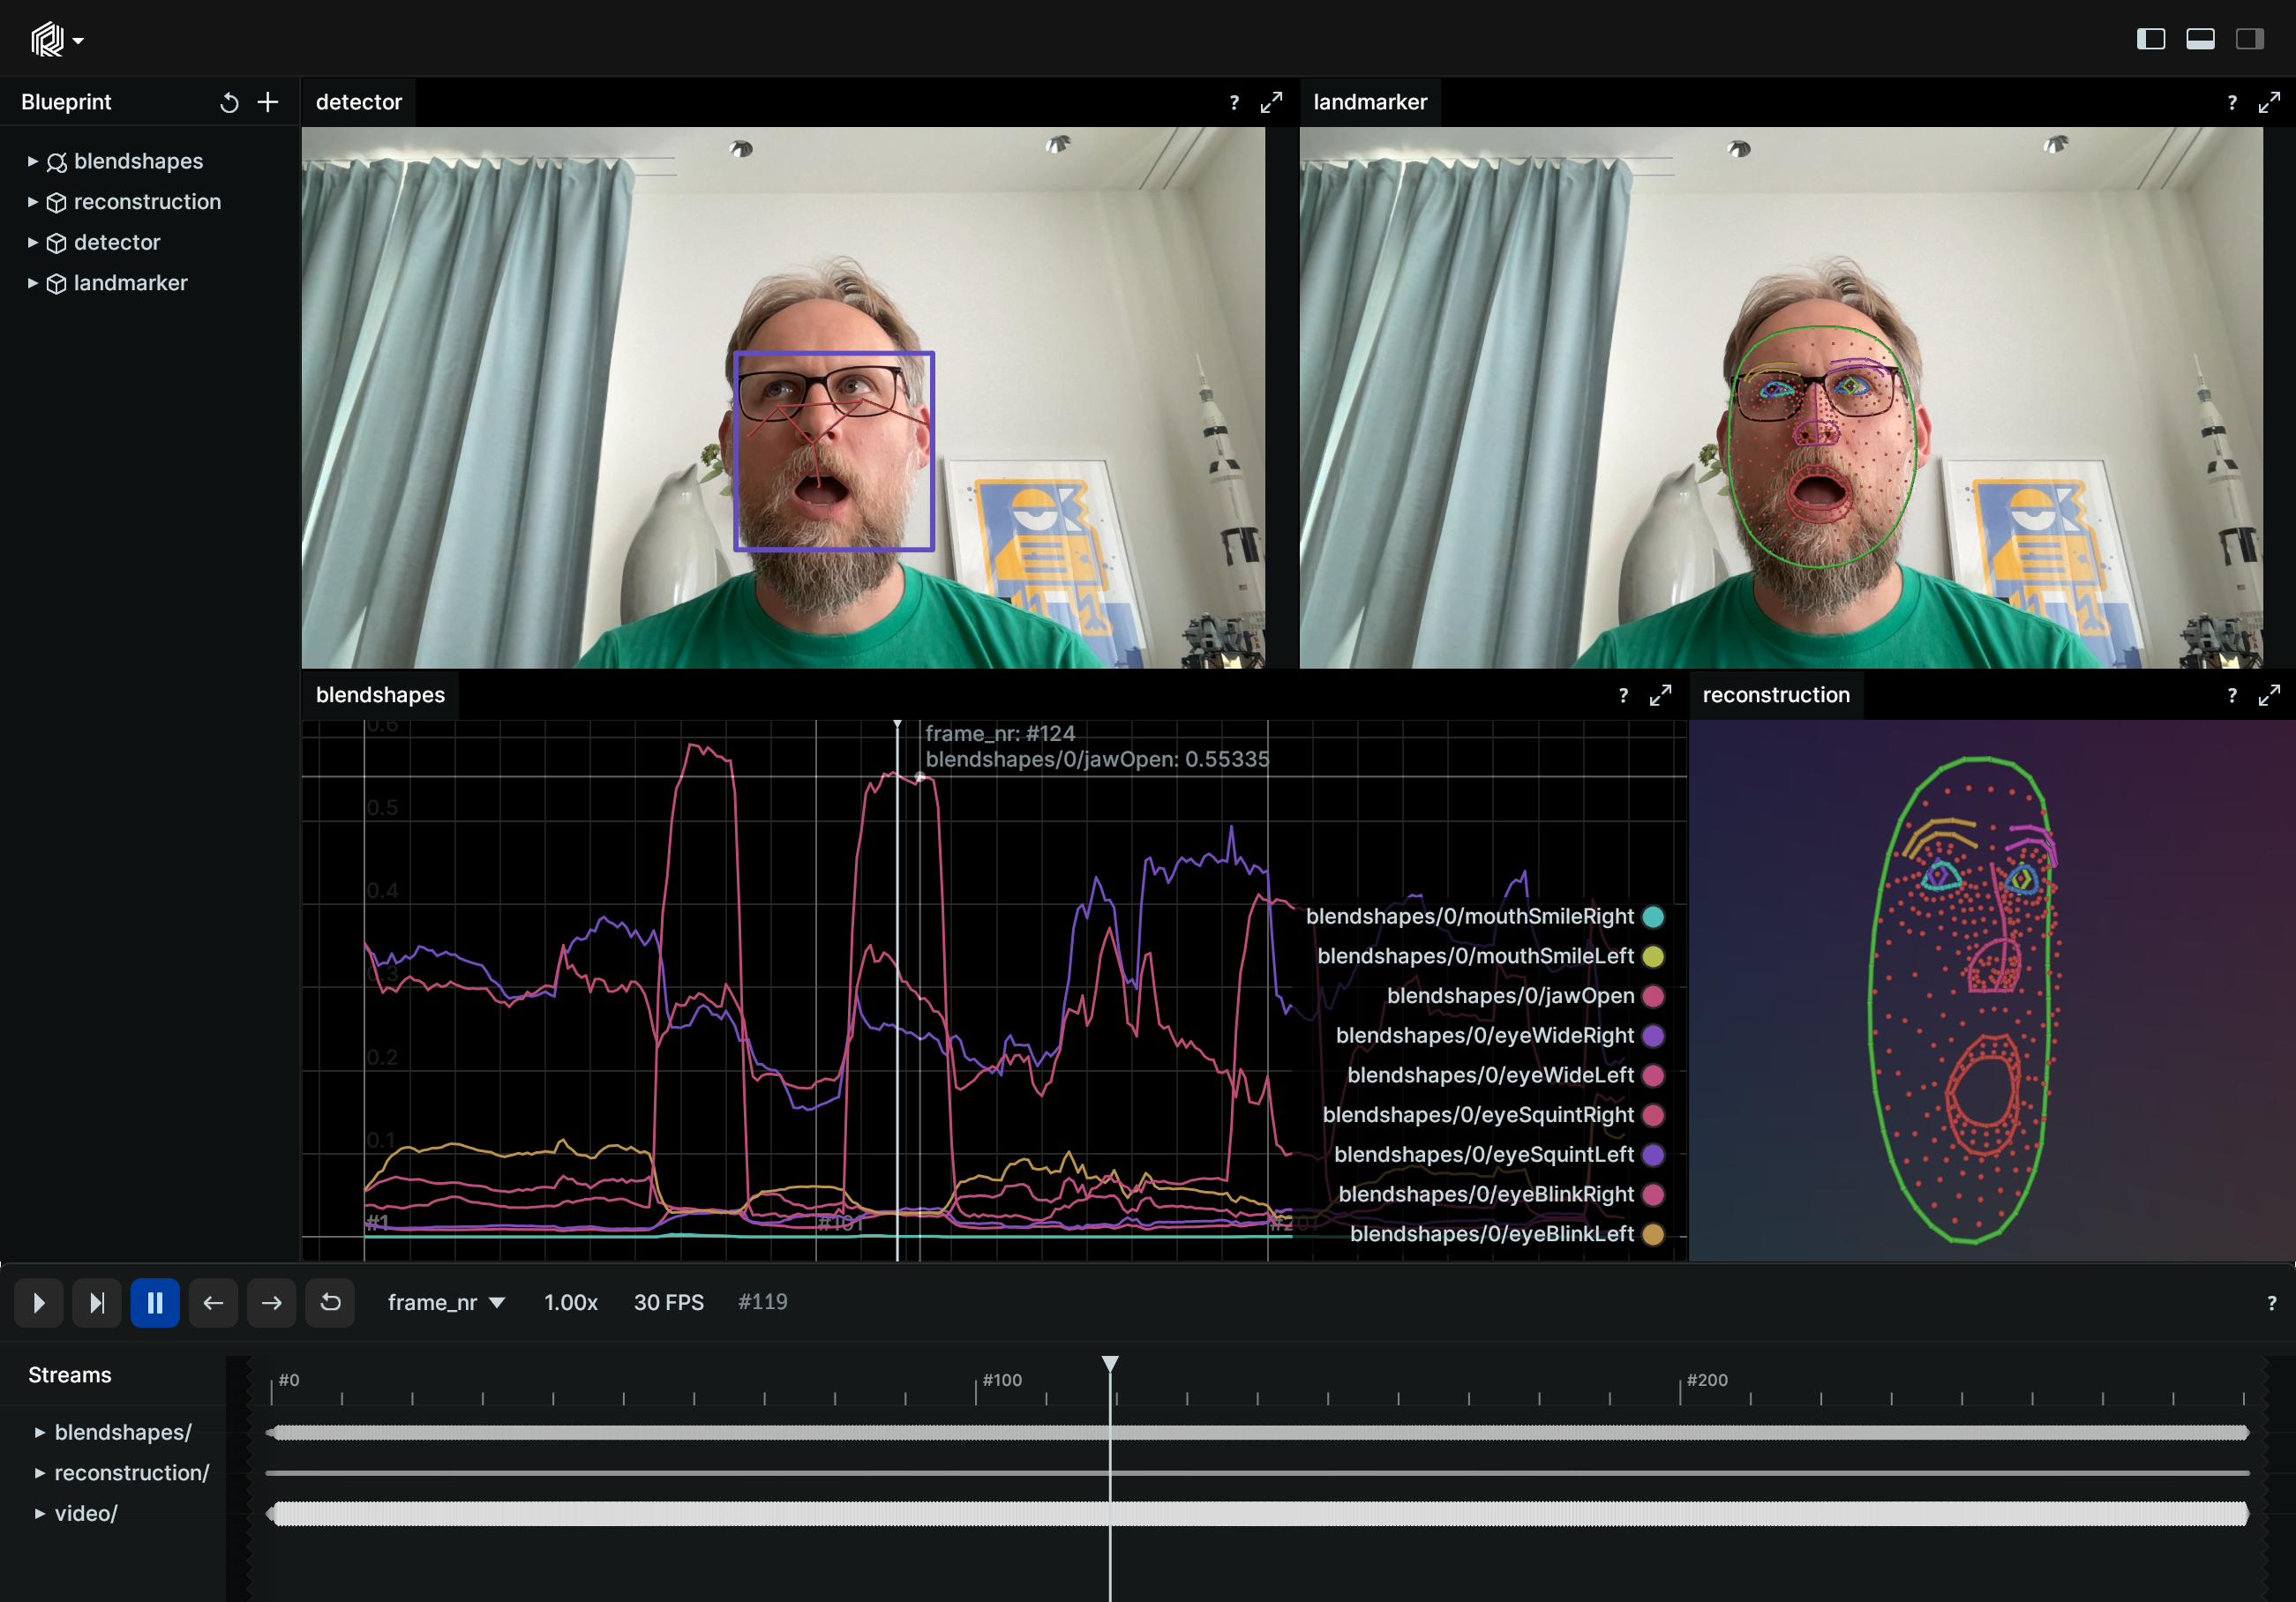
The face and face landmark detection technology aims to give the ability of the devices to interpret face movements and facial expressions as commands or inputs. At the core of this technology, a pre-trained machine-learning model analyses the visual input, locates face and identifies face landmarks and blendshape scores (coefficients representing facial expression). Human-Computer Interaction, Robotics, Gaming, and Augmented Reality are among the fields where this technology shows significant promise for applications.
In this example, the MediaPipe Face and Face Landmark Detection solutions were utilized to detect human face, detect face landmarks and identify facial expressions. Rerun was employed to visualize the output of the Mediapipe solution over time to make it easy to analyze the behavior.
Logging and visualizing with Rerun logging-and-visualizing-with-rerun
The visualizations in this example were created with the following Rerun code.
Timelines timelines
For each processed video frame, all data sent to Rerun is associated with the two timelines time and frame_idx.
rr.set_time("time", duration=bgr_frame.time)
rr.set_time("frame_idx", sequence=bgr_frame.idx)
Video video
The input video is logged as a sequence of Image objects to the 'Video' entity.
rr.log("video/image", rr.Image(frame).compress(jpeg_quality=75))Face landmark points face-landmark-points
Logging the face landmarks involves specifying connections between the points, extracting face landmark points and logging them to the Rerun SDK. The 2D points are visualized over the video/image for a better understanding and visualization of the face. The 3D points allows the creation of a 3D model of the face reconstruction for a more comprehensive representation of the face.
The 2D and 3D points are logged through a combination of two archetypes. First, a static
ClassDescription is logged, that contains the information which maps keypoint ids to labels and how to connect
the keypoints. Defining these connections automatically renders lines between them.
Second, the actual keypoint positions are logged in 2D and 3D as Points2D and Points3D archetypes, respectively.
Label mapping and keypoint connections
An annotation context is logged with one class ID assigned per facial feature. The class description includes the connections between corresponding keypoints extracted from the MediaPipe face mesh solution. A class ID array is generated to match the class IDs in the annotation context with keypoint indices (to be utilized as the class_ids argument to rr.log).
# Initialize a list of facial feature classes from MediaPipe face mesh solution
classes = [
    mp.solutions.face_mesh.FACEMESH_LIPS,
    mp.solutions.face_mesh.FACEMESH_LEFT_EYE,
    mp.solutions.face_mesh.FACEMESH_LEFT_IRIS,
    mp.solutions.face_mesh.FACEMESH_LEFT_EYEBROW,
    mp.solutions.face_mesh.FACEMESH_RIGHT_EYE,
    mp.solutions.face_mesh.FACEMESH_RIGHT_EYEBROW,
    mp.solutions.face_mesh.FACEMESH_RIGHT_IRIS,
    mp.solutions.face_mesh.FACEMESH_FACE_OVAL,
    mp.solutions.face_mesh.FACEMESH_NOSE,
]

# Initialize class descriptions and class IDs array
self._class_ids = [0] * mp.solutions.face_mesh.FACEMESH_NUM_LANDMARKS_WITH_IRISES
class_descriptions = []

# Loop through each facial feature class
for i, klass in enumerate(classes):
    # MediaPipe only provides connections for class, not actual class per keypoint. So we have to extract the
    # classes from the connections.
    ids = set()
    for connection in klass:
        ids.add(connection[0])
        ids.add(connection[1])

    for id_ in ids:
        self._class_ids[id_] = i

    # Append class description with class ID and keypoint connections
    class_descriptions.append(
        rr.ClassDescription(
            info=rr.AnnotationInfo(id=i),
            keypoint_connections=klass,
        )
    )

# Log annotation context for video/landmarker and reconstruction entities
rr.log("video/landmarker", rr.AnnotationContext(class_descriptions), static=True)
rr.log("reconstruction", rr.AnnotationContext(class_descriptions), static=True)

rr.log("reconstruction", rr.ViewCoordinates.RDF, static=True)  # properly align the 3D face in the viewer
With the below annotation, the keypoints will be connected with lines to enhance visibility in the video/detector entity.
rr.log(
    "video/detector",
    rr.ClassDescription(
        info=rr.AnnotationInfo(id=0), keypoint_connections=[(0, 1), (1, 2), (2, 0), (2, 3), (0, 4), (1, 5)]
    ),
    static=True,
)
Bounding box
rr.log(
    f"video/detector/faces/{i}/bbox",
    rr.Boxes2D(array=[bbox.origin_x, bbox.origin_y, bbox.width, bbox.height], array_format=rr.Box2DFormat.XYWH),
    rr.AnyValues(index=index, score=score),
)
2D points
rr.log(f"video/detector/faces/{i}/keypoints", rr.Points2D(pts, radii=3, keypoint_ids=list(range(6))))rr.log(
f"video/landmarker/faces/{i}/landmarks",
rr.Points2D(pts, radii=3, keypoint_ids=keypoint_ids, class_ids=self._class_ids),
)3D points
rr.log(
    f"reconstruction/faces/{i}",
    rr.Points3D(
        [(lm.x, lm.y, lm.z) for lm in landmark],
        keypoint_ids=keypoint_ids,
        class_ids=self._class_ids,
    ),
)
Scalars scalars
Blendshapes are essentially predefined facial expressions or configurations that can be detected by the face landmark detection model. Each blendshape typically corresponds to a specific facial movement or expression, such as blinking, squinting, smiling, etc.
The blendshapes are logged along with their corresponding scores.
for blendshape in blendshapes:
    if blendshape.category_name in BLENDSHAPES_CATEGORIES:
        rr.log(f"blendshapes/{i}/{blendshape.category_name}", rr.Scalars(blendshape.score))
Run the code run-the-code
To run this example, make sure you have the Rerun repository checked out and the latest SDK installed:
pip install --upgrade rerun-sdk  # install the latest Rerun SDK
git clone git@github.com:rerun-io/rerun.git  # Clone the repository
cd rerun
git checkout latest  # Check out the commit matching the latest SDK release
Install the necessary libraries specified in the requirements file:
pip install -e examples/python/face_trackingTo experiment with the provided example, simply execute the main Python script:
python -m face_tracking # run the exampleIf you wish to customize it for various videos, adjust the maximum frames, explore additional features, or save it use the CLI with the --help option for guidance:
python -m face_tracking --help