Rerun does not yet have native ROS support, but many of the concepts in ROS and Rerun line up fairly well. In this guide, you will learn how to write a simple ROS 2 Python node that subscribes to some common ROS topics and logs them to Rerun.
For information on future plans to enable more native ROS support see #1537. In case you have recorded data, you may also want to read our documentation on using MCAP.
The following is primarily intended for existing ROS 2 users. It will not spend much time covering how to use ROS 2 itself. If you are a Rerun user that is curious about ROS, please consult the ROS 2 Documentation instead.
All of the code for this guide can be found on GitHub in rerun/examples/python/ros_node.
Other relevant tutorials:
- Log and Ingest Tutorial
- Viewer Walkthrough
- Transforms & Coordinate Frames
- Loading URDF models
- Working with MCAP
If you're new to Rerun or wonder about differences to RViz, we recommend also to read the "What is Rerun for?" introduction in our README (see here).
Install and run the example
All steps that are required to install and run this example are explained in the example's description, which can be found here or in the README.md of the example's source code.
Code explanation
It may be helpful to open rerun/examples/python/ros_node/main.py to follow along.
At a very high level, for each ROS message we are interested in, we create a subscriber with a callback that does some form of data conversion and then logs the data to Rerun. In most cases, this conversion is either trivial or easy to do with utilities from the ROS ecosystem.
For simplicity, this example uses the rosclpy MultiThreadedExecutor and ReentrantCallbackGroup for each topic. This
allows each callback thread to do TF lookups without blocking the other incoming messages. More advanced ROS execution
models and using asynchronous TF lookups are outside the scope of this guide.
Updating time
First of all, we want our messages to show up on the timeline based on their stamped time rather than the time that they were received by the listener, or relayed to Rerun.
To do this, we will use a Rerun timeline called ros_time.
Each callback follows a common pattern of updating ros_time based on the stamped time of the message that was
received.
def some_msg_callback(self, msg: Msg):
    time = Time.from_msg(msg.header.stamp)
    rr.set_time("ros_time", timestamp=np.datetime64(time.nanoseconds, "ns"))
This timestamp will apply to all subsequent log calls on in this callback (on this thread) until the time is updated again.
TF to rr.Transform3D
Next, we need to map the ROS TF2 transforms to the corresponding Rerun archetype.
Since Rerun 0.28, the Transform3D archetype supports parent/child frame relationships, which makes our conversion step straight-forward. We just have to remember that the ROS TFMessage is a container for multiple transforms that have individual timestamps each and set the time accordingly.
By specifying the parent and child frames, we can log all transforms to the same entity path, similar to the TF topic in ROS.
To make sense of these transforms in the rest of our logged data, we also have to associate them to their respective frame name using CoordinateFrames.
See the laser scan section below for an example.
More information about the different ways Rerun can handle transforms can be found here.
def tf_callback(self, tf_msg: TFMessage) -> None:
    for transform in tf_msg.transforms:
        time = Time.from_msg(transform.header.stamp)
        rr.set_time("ros_time", timestamp=np.datetime64(time.nanoseconds, "ns"))
        rr.log(
            "transforms",
            rr.Transform3D(
                translation=[
                    transform.transform.translation.x,
                    transform.transform.translation.y,
                    transform.transform.translation.z,
                ],
                rotation=rr.Quaternion(
                    xyzw=[
                        transform.transform.rotation.x,
                        transform.transform.rotation.y,
                        transform.transform.rotation.z,
                        transform.transform.rotation.w,
                    ]
                ),
                parent_frame=transform.header.frame_id,
                child_frame=transform.child_frame_id,
            ),
        )
robot_description (URDF)
Rerun features a built-in importer for URDF, so we can just forward the string received on the /robot_description topic to it.
More information about how to use URDF with Rerun can be found here.
def urdf_callback(self, urdf_msg: String) -> None:
    # NOTE: file_path is not known here, robot.urdf is just a placeholder to let
    # Rerun know the file type. Since we run this example in a ROS environment,
    # Rerun can use AMENT_PREFIX_PATH etc to resolve asset paths of the URDF.
    rr.log_file_from_contents(
        file_path="robot.urdf",
        file_contents=urdf_msg.data.encode("utf-8"),
        entity_path_prefix="urdf",
        static=True,
    )
LaserScan to rr.LineStrips3D
Rerun does not yet have native support for a LaserScan style primitive, so we need
to do a bit of additional transformation logic (see: #1534.)
First, we convert the scan into a point-cloud using the laser_geometry package.
We could have logged the Points directly using rr.Points3D, but for
the sake of this demo, we wanted to instead log a laser scan as a bunch of lines
in a similar fashion to how it is depicted in gazebo.
We generate a second matching set of points for each ray projected out 0.3m from
the origin and then interlace the two sets of points using Numpy hstack and reshape.
This results in a set of alternating points defining rays from the origin to each
laser scan result, which is the format expected by rr.LineStrips3D.
By logging also scan's frame_id as a CoordinateFrame, we make sure that Rerun visualizes the lines at the right location in the transform hierarchy.
def __init__(self) -> None:
    # …
    self.laser_proj = laser_geometry.laser_geometry.LaserProjection()


def scan_callback(self, scan: LaserScan) -> None:
    time = Time.from_msg(scan.header.stamp)
    rr.set_time("ros_time", timestamp=np.datetime64(time.nanoseconds, "ns"))

    # Project the laser scan to a collection of points
    points = self.laser_proj.projectLaser(scan)
    pts = point_cloud2.read_points(points, field_names=["x", "y", "z"], skip_nans=True)
    pts = structured_to_unstructured(pts)

    # Turn every pt into a line-segment from the origin to the point.
    origin = (pts / np.linalg.norm(pts, axis=1).reshape(-1, 1)) * 0.3
    segs = np.hstack([origin, pts]).reshape(pts.shape[0] * 2, 3)

    rr.log("scan", rr.LineStrips3D(segs, radii=0.0025, colors=[255, 165, 0]))
    rr.log("scan", rr.CoordinateFrame(frame=scan.header.frame_id))
OccupancyGrid to rr.GridMap
ROS nav_msgs/OccupancyGrid messages map directly to Rerun's GridMap archetype.
This example subscribes to the static map and the local & global costmap topics, logging them with Rerun's RViz-compatible RvizMap and RvizCostmap colormaps and with draw-order values for defined layering.
Most fields are a 1:1 mapping: the occupancy data becomes the GridMap image data, info.resolution becomes the cell size, and info.origin defines the map pose.
The main caveat is row order: ROS occupancy grids start at the map's bottom-left cell, while regular image buffers as used by Rerun's GridMap are top-row first.
The example therefore flips the rows before logging the grid data.
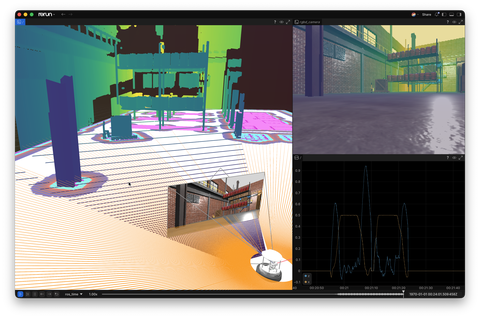
Camera info and images
ROS Images can also be mapped to Rerun very easily, using the cv_bridge package.
The output of cv_bridge.imgmsg_to_cv2 can be fed directly into rr.Image.
For the camera info topic, we can use the image_geometry package that has a PinholeCameraModel that exposes the intrinsic matrix in the same structure as used by Rerun rr.Pinhole.
Like for the laser scan, we also have to associate the data with the correct coordinate frame.
In order to have a nice projection of the image in the pinhole frustum in Rerun's 3D view, we have to establish a relationship between the 3D extrinsic camera frame and the 2D image plane.
The first is just the frame_id that we get from the ROS message, while the latter is something that isn't a concept in ROS.
To distinguish the two, we just use an _image_plane suffix in the image plane frame name and make sure that both the pinhole and image logging use it.
def __init__(self) -> None:
    # …
    self.cv_bridge = cv_bridge.CvBridge()


def cam_info_callback(self, info: CameraInfo) -> None:
    """
    Logs CameraInfo as a Rerun Pinhole.
    """
    time = Time.from_msg(info.header.stamp)
    self.pinhole_model.from_camera_info(info)
    rr.set_time("ros_time", timestamp=np.datetime64(time.nanoseconds, "ns"))
    rr.log(
        "rgbd_camera/camera_info",
        rr.Pinhole(
            resolution=[info.width, info.height],
            image_from_camera=self.pinhole_model.intrinsic_matrix(),
            image_plane_distance=1.0,
            parent_frame=info.header.frame_id,
            # Specifying a `child_frame` for the 2D image plane allows Rerun to
            # visualize the pinhole frustum together with the image in 3D views.
            # This has to match the coordinate frames used when logging images,
            # see `image_callback` below.
            child_frame=info.header.frame_id + "_image_plane",
        ),
    )


def image_callback(self, img: Image) -> None:
    time = Time.from_msg(img.header.stamp)
    rr.set_time("ros_time", timestamp=np.datetime64(time.nanoseconds, "ns"))
    rr.log("rgbd_camera/image", rr.Image(self.cv_bridge.imgmsg_to_cv2(img)))
    # Make sure the image plane frame matches what we set in `cam_info_callback`.
    rr.log("rgbd_camera/image", rr.CoordinateFrame(frame=img.header.frame_id + "_image_plane"))
Others
The example also logs more data, like depth images and parts of the odometry data. Please refer to the source code of the example to see the details of those.
In summary
Although there is a non-trivial amount of code, none of it is overly complicated. Each message callback operates independently of the others, processing an incoming message, adapting it to Rerun and then logging it again.
There are several places where Rerun is currently missing support for primitives that will further simplify this implementation. We will continue to update this guide as new functionality becomes available.
While this guide has only covered a small fraction of the possible ROS messages that could be sent to Rerun, hopefully, it has given you some tools to apply to your project.
If you find that specific functionality is lacking for your use case, please provide more context in the existing issues or open an new one on GitHub.