Configure the Viewer interactively
The Rerun Viewer is configurable directly through the UI itself.
Viewer overview viewer-overview

The central part is known as the viewport and contains the various views displaying the data.
The left panel of the Viewer is the "Blueprint Panel". It shows a visual tree view representing the contents of the current blueprint.
The right panel of the Viewer is the "Selection Panel" this panel allows you to configure specific blueprint properties of the currently selected element.
The blueprint defines the structure, the type of views, and their content in the viewport. Changing the content of the viewport is done by editing the blueprint.
After editing the Viewer you may want to save or share the blueprint.
Configuring the view hierarchy configuring-the-view-hierarchy
The viewport is made of various views, laid out hierarchically with nested containers of various kinds: vertical, horizontal, grid, and tabs. This hierarchy is represented in the blueprint panel, with the top container corresponding to the viewport. In this section, we cover the various ways this view hierarchy can be interactively created and modified.
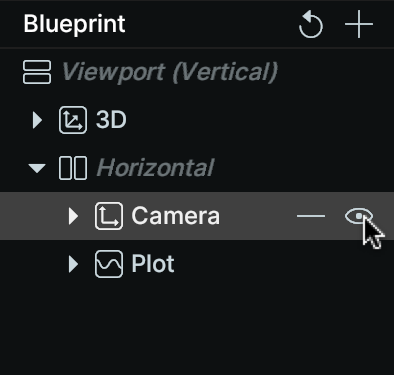
Show or hide parts of the blueprint show-or-hide-parts-of-the-blueprint
Any container or view can be hidden or shown by clicking the "eye" icon.
Add new containers or views add-new-containers-or-views
Adding a container or a view to the view port can be done by clicking the "+" at the top of the blueprint panel.

If a container (or the viewport) is already selected, a "+" button will also be available in the selection panel.

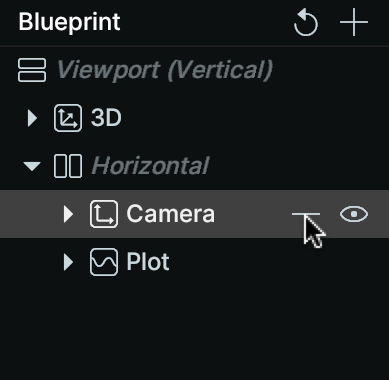
Remove a view or container remove-a-view-or-container
Removing a view or a container can be done by clicking the "-" button next to it:
Re-arrange existing containers or views rearrange-existing-containers-or-views
The viewport hierarchy can be reorganized by drag-and-dropping containers or views in the blueprint panel. It ssi also possible to drag views directly in the viewport by using their title tab:

Rename a view or container rename-a-view-or-container
Both views and containers may be assigned a custom name. This can be done by selecting the view or container, and editing the name at the top of the selection panel.

Change a container kind change-a-container-kind
Containers come in four different kinds: vertical, horizontal, grid, and tabs. To change an existing container's kind, select it and change the value from the dropdown menu in the selection panel:

Using context menus using-context-menus
The context menu is accessed by right-clicking on a container or view in the blueprint panel. Many of the previous operations are also available there:
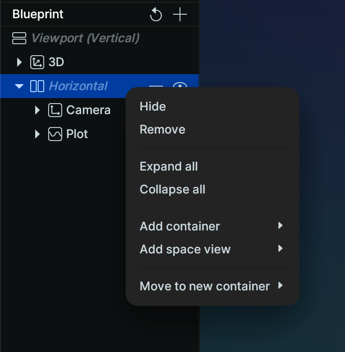
One key advantage of using the context menu is that it enable operations on multiple items at once. For example, you may select several views (ctrl-click, or cmd-click on Mac), and remove them all in a single operation using the context menu.
Configuring the content of a view configuring-the-content-of-a-view
The content of a view is determined by its entity query, which can be manually edited in the selection panel when the view is selected (see Entity Queries for more information). This section covers the interactive means of manipulating the view content (which typically operate by actually modifying the query).
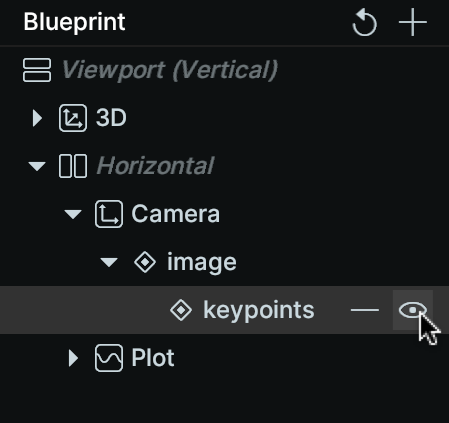
Show or hide view content show-or-hide-view-content
Like containers and views, any entity in a view may be shown and hidden with the "eye" icon or the context menu.
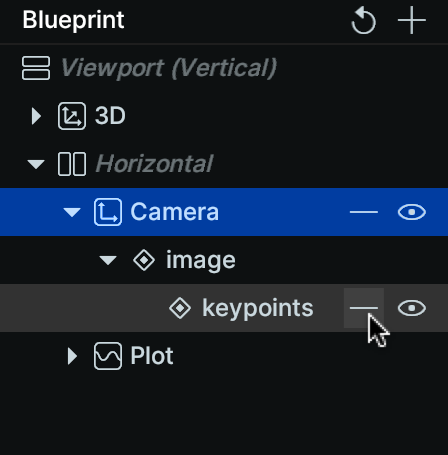
Remove data from a view remove-data-from-a-view
Likewise, entities may be removed from a view by clicking the "-" next to it:
Using the query editor using-the-query-editor
A visual query editor is available from the selection panel when a view is selected. Click the "Edit" button next to the entity query:

The query editor allows visually adding and removing entities and entity trees from the query.
Adding entities to a new view with context menu adding-entities-to-a-new-view-with-context-menu
Like with viewport hierarchy, most operations on view data are available from the context menu. In particular, a new view can be created with custom content by selecting one or more entities (either in existing views in the blueprint panel, or in the time panel's streams), and clicking "Add to new view" in the context menu:

When using one of the recommended views with this method, the view's origin will automatically be set to a sensible default based on the actual data.
Overriding visualizers and component values overriding-visualizers-and-component-values
By selecting an entity from a view, it is possible to specify which visualizer(s) should be enabled, and to override values of specific components:

When selecting a view, it is also possible to specify default values for components of a given type, which is used when no value has been logged:

See Visualizers and Overrides for detailed information and more examples.